Thursday, 25 February 2021

Steampunk 'Z' and Kotobukiya Bullet Knights Launch Hell Blaze (Z)

 has been recently dabbling in some crafty-type painting.  For xmas I worked with Byron to get Z a laser-cut steampunk 'Z' kit, which Z painted-up into the below wall art for Z's name sake.

This was Z's first foray into the world of 'dry brushing".

Z saw I was sharing my painting efforts here, and wanted to join in and asked me to include a post of Z's  recent effort here.


Also, during the earlier weeks of our shadow painting challenge, Z assembled a Kotobukiya model kit at the same time I did my Kotobukiya kit ( see my 'Kotobukiya' post further below).
In this case, Z assembled a craftsman ship Kotobukiya "Bullet Knights Launch Hell Blaze" (KP527/6400)
Z mostly enjoyed the model's assembly but did encounter a few frustrations with some pieces that needed to be glued in place, so for Z's next model she is going back to Bandai kits.


Gaslands car, "Roll'n Hazard" and Terrain

 Another Gaslands car, converted and painted during our challenge window.   I kept the original flames paint job from the toy car and converted it using parts from the North Star Minis Gaslands conversion kit, parts from my old Gorka-Morka kit and some trash bashing..

I wanted a different load out option, so the "Roll'n Hazard" has pairs of both forward and back facing machine guns.    I painted a Hazard roll sign on the driver door, because sometimes punching an idea on the nose is fun.

In the edges of the picture are 4 pieces of old dollar store $1 army man toy terrain for sand bag bunkers,  which had a crappy 20 + year old grey dry brush paint job before I gave them a proper repaint for out challenge and some practice for stone painting...

Stone Hut Terrain (Steve)

 Another old piece of Terrain from my old pile of unpainted shame.

I recall buying this hand made ceramic 'craft' Stone Hut from Campaign Outfitters around 1992.  Waaaaay back then there was precious few Terrain pieces up for sale in the hobby store.  It saw a few battles with crappy coat of grey dry brushing, and spent many a year packed-up and incomplete.  I always wanted to give it a better job more befitting the efforts of the one who crafted it.

So our paint challenge and my need to practice painting 'stone' gave me the push to put a proper paint job on this piece.


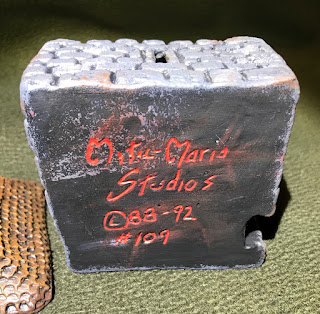
The bottom of the ceramic hut is signed by the maker.  I assume they had a method to crank out over a hundred of these little huts, but the signed bottom I assume is a testament to the hand-crafting effort.
"Mitic-Mario Studios  (c) 88-92 #109"


40k Terrain, Ruined Imperial Buildings (Steve)


I forget exactly where and when I bought these 6 pieces of  40k terrain, but  until this shadow paint challenge these were assembled, base-coated and sitting in my pile of unpainted shame for over 25 years.   Since I am going to soon paint up some recently purchased Mierce Miniatures Atalantes Mesokolossos and Kolossos, I thought I should first practice up my 'stone' painting techniques.  

I started with a couple layers of sponge stippling grey, dry brushing lighter shades of greys, and some brown/beige in the deeper parts.  I found the GW black templar contrast paints worked well for painting in the shooting pock mark damage, and for the lines between floor tiles and some of the stones I actually used some 25+ year old Citadel Color brown ink wash.  Turns out that in my old boxes of 40k stuff I recently unpacked after decades in storage, I still have a couple pots of Citadel Color inks and paints that are still viable.

So this 40k terrain is out of the pile of shame and ready for play, and painted with colors bottled and sold over a quarter century apart.


Friday, 12 February 2021

ByronM - Hatchery, Ravens, and a Ship


I have a real mixed bag for my submission today that includes some ravens from Mierce Miniatures, a 3d printed Frog lady from the Mandalorian, and a 3d printed freighter for Cruel Seas.

First up are the ravens from Mierce miniatures.  These figures are really well detailed, even though it's hard to tell due to the colour of them.  Mierce does some amazing sculpts, so if you haven't looked at them yet, check them out, I will warn you though, they are expensive, not as bad as GW pricing, but pretty damn close.  They are so nice though I could not help but pick up a viking force, and these are the first unit from that force.


I painted these figures entirely with oil paints so that I could get a nice blue/black effect, and blend back and forth without worrying about drying time.  In person they have that iridescent blue tint that real ravens do, but it only kinda shows in the images.  I also highlighted the wing tips way more than they should be in real life, but it was the only way to not have them just look like blue/black blobs.

Next up is a figure for my return to the chamber of challenges, for the hatchery.  This is a 3d printed version of the Frog Lady from the Mandalorian show, complete with her container of eggs.  

I tried to paint eggs into the blue area, but they just kept looking like polka dots, so I eventually gave up and just left the container blue.... Maybe baby Yoda finished them off as a snack...  I plan to use this figure as an objective in Star Wars games, maybe both sides are trying to get the caviar!

She is pretty basic, but that is because I was trying out some new paints.  She was painted entirely with the new Scale75 contrast paints.  Which while interesting, I think is only really usable as base coats to setup for more detailed work with regular paints on top.  But they are another tool to have, and they came in a fancy wood treasure chest.

Lastly is a freighter that I 3d printed for Cruel Seas.  The game comes with a card stock token for use in games but it looks really lame next to all the other ships as miniatures, so thingiverse to the rescue and bingo, one freighter.  Well, actually 2 as Curt asked for one as well because its too big to print on the older resin printers, but I have one of the larger format new ones, so there is one here for you when we next get to game.  The print came out ok, not perfect as the model had some issues, but a little greenstuff and it was good as new.

I painted it up pretty simply, and looked up a name of an ill fated freighter from WW2 to name it as, and then glued in some brass rod as the mast and antenna and called it done.

Sunday, 7 February 2021

ByronM - Cruel Seas box set

Today's submission is yet another side project that has been sitting around in a box since I bought it....  Cruel Seas.  I played this one with Curt a few years ago, liked the game, so picked it up.  It then sat in the box.

I pulled it out this week as a break from another project that I am working on, that I am kinda stuck on.  I figured a break from the other project would get something painted and online since it has been a while.

Here are the German S-boats.

Here are the British Vospers, both type 1 and type 2.


Nothing on these was fancy, I just followed the painting guide included in the box, and tried to keep everything clean.  Overall they look ok, but I may weather them a bit, just not sure about how it would look at this scale, as anything done would be way to large to scale, so I just left it for now.  

More on these coming, as I have a few more ships being 3d printed right now.